Monthly Archives: August 2011

Vengaya Dosai/ Onion Dosa

There are different kinds of dosais.. plain dosai, masala dosai, adai dosai, paruppu dosai, vengaya (onion) dosai, thakkali (tomato) dosai, kal dosai, uthappam, mini uthappam and many more never ending varieties. Dosai is like a flexible daughter-in-law, always ready to get accustomed to all kinds of situations!

Now, let’s make vengaya dosai or onion pancakes! The crispy taste of fresh onions roasted very lightly on top of the dosai is something to relish. The preparation of this dosai is very simple, yet could be a big hit with guests!

Vengaya Dosai/ Onion Dosa


Ingredients (makes 6 dosais)

  • basic dosai batter – approximately 4 cups
  • onions – 3 medium
  • oil  -as needed
  • ghee – as needed

Spread dosai on tawa and sprinkle onions

a closer view


Method of Preparation

  1. Take approximately 4 cups of basic dosai batter (See basic dosai recipe in https://dosaikal.com/2011/08/14/basic-dosaidosa/)
  2. Adjust water for consistency of batter
  3. Finely chop onions and keep them separately in a bowl
  4. Heat the dosaikal/ tawa and grease with little oil
  5. Spread the dosai batter and make a medium crispy dosai
  6. Sprinkle some chopped onions and oil around the edges
  7. Let it cook well and turn golden brown
  8. Turn it on the other side
  9. While turning dosai on the other side, onions would spill
  10. Do not panic. But take care while turning. If much of the onions spill on the tawa, spread it again on the tawa and place the dosai on top. Press the dosai well with the onions below
  11. Let the onions become brown
  12. Convert the dosai in a serving plate
  13. Spread a little ghee for better taste.. but this is optional
  14. Serve with any chutney of preference (https://dosaikal.com/category/chutneys/).
Advertisement

Aval Sarkkarai Pongal/ Rice Flakes Jaggery Pongal

Aval in tamil, poha in hindi and rice flakes in english is also called flattened rice or beaten rice. This is an easily digestible snack as well as a whole meal. Aval can be soaked in water or milk to make it softer. When soaked it swells to nearly double the quantity. It can be an evening snack with sugar or jaggery or a breakfast dish in the form of uppuma or even aval dosai/dosa.  When I host, I make aval sarkkarai pongal as a dessert served hot.

aval


Vellam/Gud or Jaggery is a traditional unrefined whole cane sugar. It is considered healthier than refined sugar since it retains more mineral salts (Wikipedia). It contains various essential amino acids, minerals and vitamins of the sugarcane juice and is also high on calcium which is required for maintenance of bone strength. Being rich in iron, it prevents diseases like anemia and also contains essential nutrients like magnesium and potassium. Magnesium is vital for the proper functioning of the nervous system and potassium regulates blood pressure and heart functions. (www.agriculturalproductsindia.com)

Karuppatti is another form of unrefined sugar made from palm sap. It is darker in colour than vellam and is traditionally considered healthier. I remember when we went to our grandparents’ house for vacation, elders use to have karuppatti kaapi/palm jaggery coffee or kadunkaapi or black coffee with palm jaggery.

In these fast paced modern days, usage of vellam or karuppatti is reduced to desserts. There is a real health need to go back to the old tradition of using jaggery in our day-to-day eating habits.

vellam and karuppatti


Aval Sarkkarai Pongal (serves 2)

Aval Sarkkarai Pongal is rice flakes or poha halwa made with jaggery. Palm jaggery or karuppatti can also be used.

Ingredients

  • aval/poha/rice flakes – 1 cup (thicker variety)
  • vellam/gud/jaggery – 3/4 cup (grated)
  • grated ginger – 1/2 tsp
  • ghee/clarified butter –  4 tbsp
  • cashew nuts – 2 tbsp
  • cardamom powder – 1/2 tsp
  • freshly grated coconut – 1/2 cup

Method of Preparation

  1. Wash aval two or three times, soak in water for 20 minutes and strain the water away
  2. Heat vellam/jaggery with 1/4 cup water and let jaggery dissolve
  3. Add grated ginger to jaggery and make a medium thick pouring syrup
  4. Strain the syrup
  5. Heat a pan with 2 tbsp ghee and add jaggery syrup and flattened rice
  6. Stir till aval soaks in all water and the syrup is well coated on the aval
  7. Add freshly grated coconut and stir till it mixes well
  8. Add cardamom powder
  9. Fry cashew nuts in 2 tbsp ghee
  10. Pour it over the finished aval pongal and mix well.

aval sarkkarai pongal

Some useful tips

  1. Dissolving jaggery in water and straining helps in removing sand or other impurities from jaggery
  2. Boiling grated ginger helps the juice and spice of ginger to get into the syrup; dry ginger powder can also be added
  3. Straining the jaggery syrup is done after boiling it with ginger so that ginger doesn’t come in the pongal
  4. 250gms jaggery with 2 tsp grated ginger or dry ginger powder and 1/2 cup water, can be boiled, strained and stored in the fridge for even 3 months.
  5. This syrup can be used for other jaggery based desserts and also as a substitute for white sugar in juices or porridges
  6. Thinner variety flattened rice would give halwa consistency easily; the thicker variety is useful to have a coarse texture – One can choose as the family prefers
  7. This pongal I have made is coarse in texture – Hence, a metal ladle is preferred. Wooden spatulas might mash the aval too much
  8. Thinner variety aval need not be soaked for more time
  9. Usage of coconut and ghee can always be altered.

Thakkali Kaara Chutney/Spicy Tomato Chutney

This is a very spicy chutney. Though, the spice level can be altered by the number of red chillies used, it can be really red-hot spicy. The colour of this chutney is very appealing.  With the soft dosai/pancake on a banana leaf, there is the creamy coconut chutney, tangy coriander chutney, the spicy tomato chutney and not to leave the gingelly oil mixed gun powder chutney.

Be it the steaming hot idlis/steamed rice cakes, the soft or crispy dosais, the lentil dosais or the different kinds of uthappams (recipe shortly), this chutney is a deadly combination.

All the chutneys taste the best with gingelly oil. If gingelly oil is not available, any cooking oil can be used. I have 4 red chillies for 4 ripe tomatoes since my red chillies are very spicy. So, depending upon the spice of the red chillies one can alter the number of chillies.

the chutney…

Ingredients (serves 4)

  • ripe red tomatoes (medium) – 4 no.s
  • onions (medium) – 1 no.
  • garlic cloves – 6 no.s
  • red chillies – 4 no.s
  • freshly grated coconut – 1/2 cup
  • salt – to taste
  • oil – 6 tbsp oil – preferably gingelly oil
  • kadugu/mustard seeds – 1 tsp
  • ulundham paruppu/urad dal – 2 tsp
  • curry leaves – a few

Method of Preparation

Step – I

  1. Take 1 tbsp oil in a pan
  2. Keep the burner in medium position
  3. Fry the garlic cloves till golden
  4. Add the sliced onions and fry them till they become opaque
  5. Add the red chillies and grated coconut
  6. Let the coconut roast for a while
  7. Add the randomly cut tomatoes and saute till they become soft
  8. Simmer and let this mixture mix up well for about 5 minutes
  9. Turn off the stove and let the mixture cool
  10. Take the above mixture in a blender, add salt and blend well till smooth.

Step – II

  1. Take 3 tbsp oil in a pan
  2. Add 1/2 tsp mustard seeds and let it splutter
  3. Add 1 tsp urad dal and let it turn brown
  4. Add half the curry leaves
  5. Now pour in the blended chutney into the pan
  6. Let the chutney mix well and become little thicker
  7. This might take about 5 minutes
  8. Chutney is ready.

Thaalippu/Thadka

  1. Separately heat 2 tbsp gingelly oil, add mustard seeds
  2. When they splutter add urad dal and curry leaves
  3. Pour on top of the chutney
  4. This thaalippu makes a big difference to the consistency, taste and glowy tempting looks of the chutney (see picture)
  5. The first picture is after the chutney is done. The coconut and tomatoes literally swallow the entire oil and the chutney is left with no glow
  6. The second picture shows the make-over the chutney has had!

Oh! poor me!


the chutney make-over

Important!!

  1. The number of red chillies to be used would depend on the spice quality of the red chillies.
  2. If one would like to omit garlic and onions, these can be avoided and two tsp of grated ginger can be used and the number of red chillies can be reduced
  3. This chutney would need more oil to compensate the spice of red chillies. If one prefers to use lesser oil, go on
  4. Still I would recommend reducing oil while the blended mixture is cooked. The last thaalippu helps in the balance of the spice
  5. This Blogger and blog would not hold responsibility for the result of the chutney or consumer consequences.

Vaazhaikkai Puttu/Raw Banana Puttu

Vaazhaikkai Puttu is one of my favourite dry curries.  The normal dry curry or poriyal made out of raw bananas would need more roasting to make it tastier. This dish is made of cooked and grated raw bananas. Till today I believe my mother makes it the best. This puttu can also be made with very less oil. Though I didn’t know the concept of less oil when I was little, I think the taste of dal and chillies in the seasoning must have made this more appealing.

In the dry curries, seasoning in terms of oil, mustard seeds and dal is generally not poured on top at the end. The recipe starts with oil, mustard seeds and dal, continued with curry leaves, green chillies or red chillies as per the dish. This is more or less common in all poriyals or dry curries.


Vaazhaikkai Puttu

Ingredients (serves 4)

  • vaazhaikkai/raw banana – 2 nos
  • garlic – 4 cloves
  • onion – 1 no. medium
  • green chillies – 2 no.s
  • curry leaves – a few
  • oil – 1 tsp
  • mustard seeds – 1/2 tsp
  • split urad dal – 1 tsp
  • salt – to taste
  • freshly grated coconut – 1/2 cup (optional)

Cooking Raw Banana

  1. Cut the top portion of banana skin which is hard
  2. Let the skin remain intact
  3. Boil water in a pan on the stove
  4. Cut each banana in two halves and immediately place them in water
  5. Do not leave the cut bananas out for more time – the open corners would discolour
  6. Banana halves should be well immersed in water
  7. In approximately 15 minutes bananas should be cooked – should be little more than medium cooked
  8. To check, poke a knife in the banana – the banana should feel cooked but intact and not soft
  9. Be careful – over cooked bananas become unfit for this poriyal
  10. So, keep checking in between!

 raw bananas cooked with skin


vaazhaikkai puttu


Method of Preparation

  1. Take the cooked raw bananas and gently peel the skin off
  2. Grate the banana halves in a grater – this is why the cooked bananas should be intact and not over cooked
  3. Grated raw banana should look like grated coconut
  4. Chop onion and garlic cloves to fine pieces
  5. Take 1 tsp oil in a pan, preferably non-stick
  6. Add mustard seeds, when it splutters add urad dal
  7. When dal becomes golden, add chopped onions, garlic and curry leaves
  8. Saute and add the grated bananas
  9. Add salt and mix well
  10. Do not use a wooden ladle or spatula – it might mash the grated banana
  11. Use a metal ladle – when the poriyal is mixed in the pan, the grated vegetable remains like grated coconut.
  12. This vegetable doesn’t need turmeric powder and hence would be off-white in colour
  13. Let it cook in sim position for five minutes with stirring in between
  14. When the vegetable is well mixed with the salt and the seasoning items, turn off the stove
  15. Sprinkle freshly grated coconut before serving.

Note: Sorry, the above photo is not clear enough. Photo of grated raw banana and a better photo of vaazhaikkai puttu would follow.

The Morning Cup of Coffee

Coffee is Kaapi in tamil. At home, the day always starts with a hot cup of filter coffee. Black Coffee made from the steel filter early in the morning by aachi or amma. Fresh milk boiled at the same time. Black coffee, thick milk and sugar made foamy and frothy… black coffee is called decoction. Wickipedia also mentions that ‘Decoction’ is the term used colloquially in south india to refer to black coffee prepared by the traditional method.  Dictionaries also say –  to ‘decoct’ is to extract the flavor by boiling or to make concentrated.

No left over decoction and no old milk for filter kaapi.  When the new milk packet comes home every morning, it is opened and boiled.. ready for immediate consumption of kaapi. Kaapi is served in dabara set – small bowl and tumbler/glass. The bowl is either to mix sugar separately or make the kaapi right and medium hot to drink.

Kaapi Thool or coffee powder would come from the traditional coffee grinding shop. When amma goes to get the kaapi thool, I used to accompany her sometimes. I use to love the fresh aroma of coffee beans being ground.   She would blend two varieties – choose from peaberry A, peaberry B, and Robusta and no chickory. Till the time we reach home.. the aroma of kaapi thool would travel with us – sometimes in bus, sometimes in auto or in the car. Even today, in the super markets, the aroma of ground coffee seeds takes me to those fresh aromatic days.

But, children were given coffee to drink only when they enter universities. When we were still in school, only milk and milk based porridges or drinks. Seeing thaatha, aachi, appa and amma drink foamy frothy coffee, we would also demand foamy frothy milk and fight for the best foam between siblings. After the milk is done, amma is always there to wipe our milky cat moustaches with her mundhanai – or saree pallu.


Filter Kaapi 

The Coffee Filter

  • The coffee filter has four parts – bottom cup, the upper cup, the presser and the lid
  • The upper cup is the filtering portion and has very small pores to hold the powder and let out the black coffee
  • With the presser, the powder is compressed well to hold the powder intact
  • The decoction or brewed black coffee is collected in the bottom cup
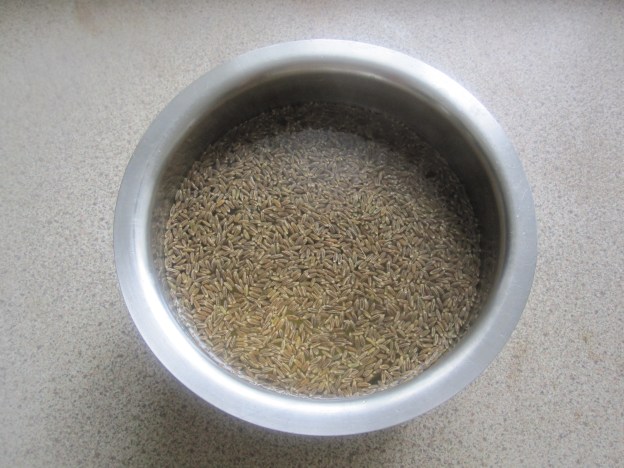


Ingredients

  • ground coffee powder – 3 heaped tsp
  • boiling hot water – 225 ml

The quantity of coffee powder can be altered to each person’s preference – strong or less stronger coffee also depending on the coffee powder.  The aroma of coffee is best stored when the upper cup with coffee powder is filled with water till brim. So, if your coffee filter is slightly bigger and can take in more water, add more coffee powder.

  bean and powder


 Method of preparation of decoction

  1. Take 3 heaped tea spoons of coffee powder in the upper cup of the filter – which has the pores/filter on it
  2. Press it with the presser to make the powder even but do not press it too hard
  3. Pour in the boiling hot water on the pressed coffee powder in the upper cup till brim
  4. Close with lid and let the decoction brew down
  5. If one finds the coffee very strong, take the first decoction out and pour half the quantity water and let it percolate again – this is the second decoction and is less stronger than the first
  6. One can either use the blend of both first and second decoctions or just the first.


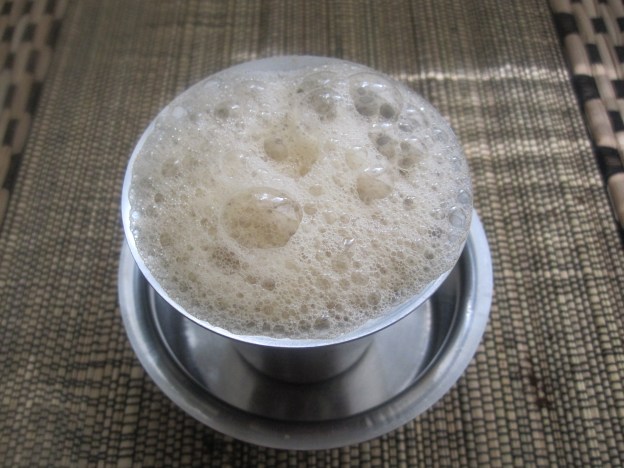
making the decoction foamy


The Dabara Kaapi


the traditional cuppa


To make one cup of coffee

  1. Take 1/3 cup of black decoction with or without sugar as preferred and make it frothy.
  2. Making the decoction foamy and frothy is an art by hand (see picture)
  3. Boil 2/3 cup of milk in a vessel on stove
  4. When the milk boils, pour in the frothy black decoction and pour it back and forth again in the vessel to make it more frothy
  5. When it is hot enough, pour in the tumbler 
  6. Place the tumbler in the dabara and serve
  7. Adjust sugar or milk according to preferences. 

Seeraga Thanneer/Cumin Seed Water

Simple ailments can be taken care at home. A normal cough, running nose or sore throat in the initial days, a mild stomach upset, headache, vomiting due to intake of unsuited food and some others can be dealt with herbs in the spice rack. These are some of those granny’s home remedies which I have always used for my family.

But, do keep in mind that these are not remedies for unknown ailments or symptoms of diseases. Anyone allergic to any of the ingredients should avoid using them. If suited, these have no side effects, since these ingredients form part of the day-to-day cooking.

Seeraga Thanneer or Cumin Seed Water

The tamil word for Cumin/Jeera is Seeragam. The word can be split into two – Seer+Agam.  Seer means good state or condition and agam here is the inner body. The spice that sets the inner body in good condition is called Seeragam. Siddha and Ayurveda systems mention that seeragam reduces stomach aches and indigestion and heaviness of stomach. It also sets appetite right and purifies blood. It has vitamins B, C and E and iron.

Whenever there is a stomach upset, indigestion which might lead to loose motion or vomiting – try this. Even on normal days, not only to avoid the above problems but also to maintain a healthy system, Seeraga Thanneer can be had instead of water.

seeraga thanneer


Ingredients

  • water – 1 litre
  • seeragam/cumin seeds – 5 tsp

Method of Preparation

  1. Boil 1 litre of water
  2. Turn off the stove
  3. Wash cumin seeds if muddy
  4. Add cumin seeds to the vessel of water
  5. Close with lid
  6. Let it cool
  7. Each time you drink cumin water, keep draining the seeds
  8. Let the cumin seeds remain in the left over water
  9. If one litre seems too much, you can make half the quantity initially
  10. One tsp cumin seeds to one cup water would also make warm cumin tea

Vengaya Chutney/Onion Chutney

This is a very simple chutney to go with all kinds of lentil based dosais. By lentil based dosais, I mean those with more proportion of lentils to rice. The basic dosai has rice and dehusked black gram in the ratio 4:1 – 4 cups of parboiled rice and 1 cup of dehusked black gram. Lentil Dosais would have more quantity of lentils to rice. (eg. Whole lentil dosa and many more to come). These chutneys are also good for basic dosais, no doubt.


Ingredients

  • vengayam/onions – big -3 nos
  • thakkali/tomatoes – big – 2 nos
  • poondu/garlic – 6 cloves
  • milagai vatral/dried red chillies – 3 nos
  • salt – to taste
  • oil – 1 tsp

Thaalippu – Tadka

  • oil – 1 tsp
  • mustard seeds – 1 tsp
  • broken urad dal – 1 tsp
  • curry leaves – a few

Method of preparation

  1. Take 1 tsp oil in a chatti/deep pan
  2. When oil is hot, add garlic cloves and fry till golden
  3. Add onions and saute for 2 minutes
  4. Add tomatoes and dried red chilles and fry till tomatoes becomes soft
  5. Simmer stove accordingly. Due to less usage of oil, there are chances of onions getting burnt if stove is kept on high flame
  6. When tomatoes are soft enough to be mashed with a spoon, turn off the stove
  7. Let it cool
  8. Add salt and grind it well in mixer grinder or blender till smooth
  9. For tadka, heat oil in a small pan
  10. Add mustard seeds
  11. Let mustard seeds splutter, add urad dal
  12. When urad dal becomes light reddish, add curry leaves
  13. Pour this into the chutney
  14. Red chillies can be adjusted according to required spice of the family

Payaru Dosai/Whole lentil Dosai/Dosa

This is a dosai/dosa with the goodness of many kinds of lentils in it. Lentils are a rich source of protein. They also contain dietary fiber, folate, B vitamins, minerals and are also a good source of iron. Generally, paruppu/dhal or sundal/cooked lentil snacks can be made of pachai payaru/whole green gram and karuppu kondaikadalai/black chickpea. Muzhu ulundhu/whole black gram is used in dhal makhni in north indian cuisine and some specialities like ulundhankali/black gram halwa (recipe would follow later) in tamilnadu cuisine.

This dosai combines whole green gram, whole black gram and black chick peas with both raw rice and par boiled rice.


Ingredients

  • pachai payaru/whole green gram – 100 gms
  • muzhu ulundhu/whole black gram – 100 gms
  • karuppu kondaikkadalai/black chick peas – 100 gms
  • pacharisi/raw rice – 50 gms
  • puzhungal arisi/parboiled rice – 50gms
  • vendhayam/fenugreek seeds – 1 tsp
  • red chillies – 4 nos.
  • salt – 1 tsp

Method of preparation

  1. Take all the lentils and rice together in a wide vessel and wash well
  2. Soak the washed rice and lentil in nearly double quantity of water
  3. Add fenugreek seeds
  4. Cover with loose lid and let it soak for 8 hours
  5. In a wet grinder or blender, with 4 red chillies grind the above ingredients to a smooth paste
  6. Number of red chillies can be adjusted according to each household
  7. Add salt to the ground batter
  8. Dosais can be made immediately
  9. Alternatively, the lentils and rice can be soaked overnight and ground in the morning and dosais are ready for breakfast immediately

whole lentil dosai with onion chutnie, yoghurt and filter coffee

TIPS

  1. Beware: the batter tends to become sour and unfit for making dosais if not stored in fridge immediately
  2. The above mentioned quantity would make approximately 12 dosais
  3. Lentils may cause bloating, gas and heart burns. Hence, garlic could be added to the chutnie  to be had with the dosais
  4. Any spicy, red chilly chutnie would go well with this dosai
  5. With the red chutnie, a bowl of yoghurt could also aid in tackling the spice
  6. I always make the vengaya (onion) chutnie for this (please see chutnie category)
  7. Nothing can beat a hot cup of filter coffee to end it all.

Plain Dosai/Dosa

 Dosais/Dosas or Pancakes

Dosais/Dosas can be called the south indian pancake. The staple food of the tamils has been rice and other grains. In Tamilnadu, idlis and dosais – the blend of parboiled rice and dehusked black gram – are taken for breakfast and dinner with several varieties of chutneys to go with it.

These dosais are made soft and fluffy as a day-to-day affair. Elders at home prefer it this way as it is easier for their teeth. The children like them crispy. The elders have  the dosais with gingellyoil, where mothers prefer to give the kids with lots of ghee or clarified butter. Gingelly oil is another name to sesame oil. Wikipedia mentions that chinese, japanese and koreans use it as a flavour enhancer. In the south of india, gingelly oil is a cooking medium by itself. It is also used as a raw mixture to chutneys and chutnie powders.

Dosais can also be made from other different kinds of grains. In this section, we shall see the different kinds of dosais.

Plain Dosai/Dosa

The ground batter is used as Idli for the first day. The second day, when the batter becomes more sour is fit for making dosais. But I make dosais out of the first day batter too. The fenugreek seeds in the batter brings out the colour of the dosais.

Ingredients

  • Idli/Dosai Batter – as per need

What brings out better dosais/dosas

  1. The best dosais come out of wet grinders which are the traditional stone grinders
  2. Nevertheless, good blenders could do a good job
  3. The quality of dosaikal or the tawa/pan is important 
  4. Cast iron pans give out very good dosais but nonstick pans are good with less oil consumption
  5. Well fermented batters bring out the best dosais 
  6. The consistency of batter – not too thick and not too watery to pour in the pan

Method of Preparation

  1. When the batter is well fermented, mix it well from the bottom with a ladle
  2. Adjust water – the batter should be medium thick pouring consistency
  3. Turn on the stove and keep the pan on it
  4. Heat up the pan
  5. Sprinkle some water on the pan
  6. Apply 1/2 tsp gingelly oil preferably or any cooking oil to the dosaikal/pan
  7. Rub the oil evenly on the dosaikal with a kitchen tissue
  8. Pour the dosai batter in the middle of the tawa and spread it evenly in circular motion
  9. Let the stove be in full position
  10. Sprinkle droplets of oil around the corners
  11. After the dosai turns a little brownish, simmer the stove and turn it to the other side
  12. In less than 30 seconds on the other side, dosai is ready
  13. Apply a bit of ghee or clarified butter on top and serve
  14. The first dosai may not be the best. After the tawa is well used to oil, dosais come out better. So, better not ask for the first!


Dosai made in cast iron dosaikal/tawa, with oil spread around the corners


Turned on the other side – dosai is ready


 the third or fourth dosai is the best  


Serve the dosais with chutney (https://dosaikal.com/category/chutneys/), sambar or gun powder chutney.

Inji thuvayal – Ginger Chutney

Chutneys are an important part of tamilnadu cuisine. The staple food Idli – steamed rice cake and Dosai – Rice and lentil pancake is always had with different kinds of chutneys. These might vary in their combination of ingredients – coconut, dals and vegetables to make it more spicy, tangy or very spicy.

Inji thuvayal – Ginger Chutney

Inji Thuvayal is an accompaniment for kaaikari sodhi or the vegetable stew. This is mainly for digestional purpose since coconut milk makes the dish very heavy. Ginger aids in digestion.


Ingredients

  • Ginger – 5 tsp
  • red chillies – 3 nos
  • freshly grated coconut – 1/4 cup
  • tamarind – 1 small lemon sized
  • salt to taste
  • oil – 1 tsp for frying

Thaalippu – Tadka

  • oil – 1 tsp
  • mustard seeds – 1/2 tsp
  • broken urad dal – 1/2 tsp
  • curry leaves – a few

Method of preparation

  1. Heat 1 tsp oil in a pan
  2. Fry ginger and red chillies for a while
  3. Now add freshly grated coconut and tamarind and fry for a while
  4. Grind all the above together in a blender to a fine paste
  5. For tadka, heat oil in a small pan
  6. Add mustard seeds
  7. Let mustard seeds splutter, add urad dal
  8. When urad dal turns light reddish, add curry leaves
  9. Pour this into the chutney
  10. Serve with stew.